
This blog post contains affiliate links. If you purchase an item using our link, we may receive a small commission at no additional cost to you.

Whether you want lights next to the garage door or a light over the garage, choosing garage door lighting can be a hard decision with all of the options that are available!
Choosing the exterior lighting near your garage door not only enhances the aesthetics of your home but can also improve safety and security.
It's essential to consider the options for placement, sizing, and aesthetics. In this guide, we'll explore the different placement options, optimal heights, distances from the garage door, and how sizing of light fixtures plays a role in your decision-making process.
We’ll also explore how you can model your garage door lights in Canva to see which option looks best!
Placement of Exterior Garage Lights
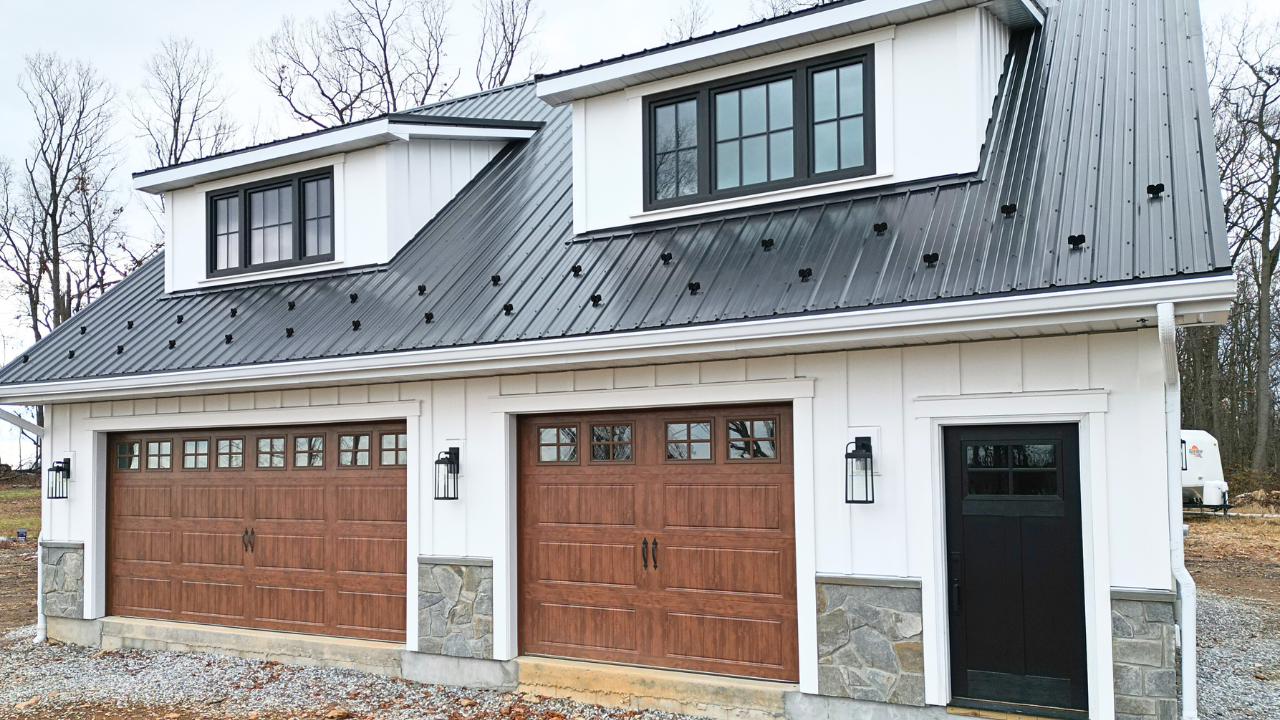
When it comes to placing exterior lighting near your garage door, you have two options: above the garage door or beside it.
1. Above Garage Door Lighting
Placement:
Mounting light fixtures directly above the garage door is a classic and popular choice. This placement provides even illumination and ensures that the area in front of the garage is well-lit. Place the fixture in the center of the door.
Optimal Height:
The ideal height for light fixtures above the garage door is typically ~6” to 12” above the garage trim or garage door. Make sure that the final height does not interfere with the garage trim or the operation of the garage door.
2. Lights Next to Garage Door
Placement:
If your garage door has limited space above the garage door or if you prefer the look of lanterns beside the door, installing fixtures on the sides is another great option! You can mount them on the walls adjacent to the garage door, at least 6” from the trim.
Optimal Height:
For fixtures beside the garage door, aim for a height of ~66”-72” off of the ground to the center of the fixture.
Sizing of Light Fixtures
The size of your light fixtures is essential not only for aesthetics but also for practicality. When you're switching out existing fixtures and can't change their location, you’ll want to choose new ones that fit the space.
Sizing For Above-the-Door Fixtures:
The size of the light fixture should be ~¼ -⅓ the width of the garage door.
When replacing existing fixtures above the garage door, consider fixtures with similar dimensions. This helps maintain the curb appeal of your home. However, you can upgrade to a more modern or energy-efficient model to improve performance and aesthetics.
Sizing for Beside-the-Door Fixtures:
The size of the light fixture should be ~¼-⅓ the height of the garage door.
Most residential garage doors are either 7’, 7.5’, or 8’ tall. Older homes will likely have a garage that is 7’ tall where most newer homes have garages that are either 7.5’ or 8’ tall.
With those measurements in mind, you’ll likely want a fixture that is ~21-32” in height.
If you're replacing existing fixtures, ensure the new ones fit the space without obstructing doors, windows, or other architectural features. You can select fixtures that are narrower or more compact if necessary.
Garage Door Lighting Ideas:
When shopping for outdoor garage lighting, you likely already have some ideas in mind of styles of light fixtures you like.
Using an application like Canva is an easy way to mock up the light fixtures next to your garage so that you can easily visualize the final look!

VS.

1. Choose a Few Garage Door Lights
Start your search with a simple Google search including the style in your search such as:
- Contemporary Garage Lights
- Outdoor Farmhouse Sconces
- Traditional Outdoor Garage Lights
Here are a few of the lights we loved and modeled:


2. Photograph the Exterior of Your Home
Once you’ve found a few options you really like, it’s time to model them so you can see it on the exterior of your house! Take a few photos of the exterior of your home from different angles. Photograph the area when it’s well lit so you have the best lighting!
Here are some examples:


3. Save Photos of the Garage Door Lights
Navigate to the product pages of the exterior lighting. Save a few product photos. If the product page has photos with a white background, save those but if there aren’t any options with white backgrounds, don’t worry, we will be removing the background either way.
4. Add the Photos to Canva
If you don’t already have a Canva.com account, you’ll need to create one. It’s free to create an account but if you want to use the advanced features, you’ll need to pay for an account. I’d recommend using the free version to get started!
Once your account is created, follow these steps to create a new design with your image:
- Select “Upload”
- Choose the image of your garage doors
- Select “Use in new design”
- Select “Custom Size” from the dropdown
- Select “Create New Design”
You’ll now see your photo as the background image of your new design. You can adjust the brightness, contrast, and sharpness of this image by selecting the image and clicking “Edit Photo.”
Now it’s time to add the light fixture images. If you have a Canva Pro Account (paid account) follow the steps below. If you are using the free version, skip to the next section to remove the background of the images first!
- Click “Uploads” on the left-hand side
- Select “Upload Files”
- Select all of the light fixture files
- Once the images are uploaded, click the photos. They will be added to your design.
5. Removing the Background of the Light Fixtures
The goal of modeling the light fixtures is to make the photo as realistic as possible! The first step to making this possible is removing the background of the light fixtures.
- If you have a Canva Pro account (paid account), you’ll have access to a feature called BG Remover.
- Select your image within your design
- Select “Edit Photo”
- Select “BG Remover”
Canva will work it’s magic and remove the background of your photo. If you need to remove or restore portions of the image, select “BG Remover” again to access additional tools.
- If you are using the free version of Canva, you can use the website https://www.remove.bg/. They have an option to remove the background of images for free.
- Select your image from your computer files. Removebg will work it’s magic and automatically remove the background. If you need to remove or restore portions of the image, select “edit.”
- Download the image
- Next, upload the image to Canva
- Click “Uploads” on the left-hand side
- Select “Upload Files”
- Select the light fixture files with the background removed
- Once the images are uploaded, click the photos to add them to the design.
6. Resizing and Placing the Light Fixture Photos
Now that you have the image of your garage and the light fixtures uploaded to Canva, it’s time to resize the light fixtures so that they look realistic on the facade.
You can resize and rotate the images as needed!
Video Tutorial of Using Canva to Model Lighting
Best Exterior Garage Door Lighting
Selecting the best exterior garage door lighting involves consideration of placement, height, distance, sizing, and aesthetics. By considering all these factors, you can ensure that your garage area is well-illuminated and visually appealing.
Whether you're installing new fixtures or upgrading existing ones, the right lighting choice can be challenging but keep in mind it’s not permanent and is always something you can replace again in the future!